Showing posts with label Eating. Show all posts

Tuesday, October 2, 2012

FarmRich Review and Giveaway

***CLOSED*** Congrats to Sara R. for winning! ***
 
Have you tried FarmRich foods?  FarmRich is a food company that prides itself in being there for moms by creating easy-to-prepare snacks that are sure to be a hit for the whole family.  They have been around for 25 years, but I had never heard of them until I was recently contacted by their company to do a review and giveaway of their products on my blog.

First we sampled FarmRich Mozzarella Sticks.  I'm not usually one to buy frozen snacks for my family, so they were extra excited to try these.  And the FarmRich Mozzarella Sticks did not disappoint.  They were quick to prepare in our toaster oven and made a great Saturday afternoon snack.  I wasn't thrilled about the amount of fat and sodium in this product, but that's why I tend to avoid frozen snacks in the first place.  For taste and convenience these were great!

We also tried FarmRich Italian Style Meatballs.  I actually wanted to try the Turkey Meatballs that FarmRich makes, but they were not available at my local store.  The meatballs were again easy to prepare and yummy!  There are enough in a package for two or three meals for my family, or they would be great as an appetizer for a large gathering! 

So would I buy FarmRich again?  For a party, special treat, or other gathering- yes.  For everyday consumption by my family- no.  The FarmRich food was yummy and easy to prepare.  Plus you can make how much you need for your gathering.  But I'm not a fan of all the fat and sodium and other "extras" that come in prepackaged and frozen foods.  And while I don't know how to make my own mozzarella sticks, I can certainly make my own meatballs. 

One extra thing I really like about the FarmRich website is that you can look up where to buy their products, recipes, and nutrition information for each item they sell!

Giveaway!
One lucky reader will win two coupons to try FarmRich products for themselves!  To enter please leave a comment sharing one of your family's favorite snacks!  (And please leave your email address so I can contact the winner.)

Giveaway closes Friday, October 5th at midnight EST.  Good luck!

*I was given two coupons to try FarmRich products to facilitate this review.  All opinions are my own.

Wednesday, September 5, 2012

It's Baby Food Making Time!

My baby is 7 months old!  How did the past half a year (plus a month) fly by?! I am now in the midst of baby-food making, a stage that I enjoy and dislike at the same time.  I enjoy making my baby's food because it is:
a) cheaper than buying bottled baby purees
b) easy to do
c) as I'm making purees I can mix them into my other kids food too (they haven't noticed the carrots in the smoothie or squash in the spaghetti sauce!)

I dislike making my baby's food because:
a) it takes time

So this time around I'm trying to simplify and stream line my baby-food making methods.  I give my daughter more from what we eat and make a big batch of purees for the freezer at the same time I'm making dinner.  So far this is working well for us!

Interested in making baby food at home?  Here is a great site with lots of information and recipes for making your own baby food.

Wednesday, August 29, 2012

Fancy Nancy Manners Dinner

We checked out Fancy Nancy (by Jane O Connor) from the library and after a few read throughs my children were enthralled by the idea of dressing up to have a fancy dinner just like the characters in the book.

My husband and I decided to take the idea one step further and have a fancy etiquette dinner where we would not only put on fancy clothes and eat on fnacy dishes, but we would practice our fancy manners as well.

It was a hit!  The kids were thrilled that Mommy and Daddy got so fancy (my husband wore his tux and I wore an old homecoming dress...things that usually sit untouched in the back of our closet!)  And everyone really did demonstrate better manners than usual (with a little reminding from the parents.)  We hope to have more "Fancy Nancy Dinners" in the future!

Tuesday, November 15, 2011

Battling Anemia

At Amy's two year old check up her iron levels tested pretty low- low enough to be anemic.  Luckily this is a medical condition that can be fixed relatively easily!

Iron deficiency is relatively common in toddlers, and although your child's iron levels are hopefully not so low to be considered anemic, there are some things you can do to make sure your little ones gets enough iron:

-feed your child iron-fortified cereal.

-try to include red meat and green leafy vegetables in your toddlers diet.  This one is hard for picky eaters!  We have started making green smoothies (there are some great recipes here and here.) to get more of those veggies into our kids diets, and they love them!

-limit milk consumption to 16-24 ounces a day.

If you are at all concerned about iron deficiency or anemia, please talk with your child's pediatrician!

Tuesday, July 12, 2011

Hot Pad Holders and Ice Pops

Duncan Hot Pad, Azure+Fla-vor-ice Freeze Pops, Assorted Flavors (200 Pops) = Happy Kids!

We love Ice Pops, aka Otter Pops, although we don't usually buy the name brand ones.  But because they are frozen my children have a hard time holding them.  And then the melting ice pops get spilled everywhere!
 
So one day we wrapped a hot pad holder around the ice pop, and our problems were solved!  Now when we get out the ice pops we grab the hot pad holders too!

Don't forget to enter our giveaway for a pack of Seventh Generation Free and Clear Diapers here!  Giveaway ends Thursday at midnight, EST!

Friday, March 4, 2011

Ecousable Water Bottle Review

Last week we our daily trek to the mailbox found a package to us from Ecomom. It was an Ecousable Water Bottle for us to review!

The kids (okay, me too) were excited and we opened it up to try it out right away. Isaac loved the lid and spinning the carabiner around his finger, Amy loved chewing on the bottom because of it's non-slip pad. And I loved that no matter how hard they chewed, spun, or dropped it the water bottle held together and withstood their excitement.

The verdict: We love it! I had been wanting to get some metal water bottles because they are reusable and don't leach anything into the water or drink we put inside. This one is 10 oz, which is perfect for kids, and the carabiner on the lid is easy to hook to the diaper bag.

If you're interested in water bottles, or other earth friendly items, check out the Ecomom website.

We received a water bottle from Ecomom. All opinions are my own.

Friday, February 25, 2011

Little Kitchen Helpers

My kids love to help me in the kitchen, or at least feel like they are helping. I'm thinking that inventing a kitchen with toddler sized counters would be a good idea!

The other night we had a cheese strata for dinner that was not only yummy and versatile (use what you have on hand and adapt what you don't), but great for kid participation. Here's the recipe:

Cheese Strata
Ingredients:
1 cup shredded cheese (any kind)
1/2 cup cut lunch meat (we just finished off an open package from the fridge)
6 slices of bread (or 8 if your kids are helping and they are hungry and want to nibble as they cook)
2 cups cooked broccoli (or peas or corn)
2 cups milk
5 eggs
2 teaspoons prepared mustard
A dash of salt and pepper

Directions:
Cut the bread into pieces and layer half into the bottom of a greased casserole dish. Isaac helped with cookie cutters for this part.

2. Cover bread with cheese, meat and broccoli. Cover with remaining bread.

3. Mix eggs, milk, mustard, salt and pepper together:

4. Pour egg mixture over the bread. (You can cover and store it in the fridge for up to 24 hours.) Bake at 425 for 50-60 minutes.

I think helping make dinner made the kids more excited to eat their masterpiece!
What are your favorite "kid friendly" recipes?

Monday, February 14, 2011

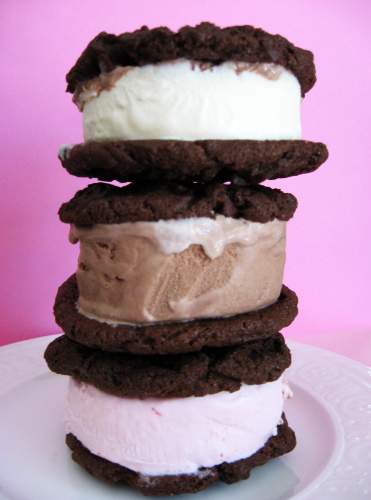
Birthday Cake Ice Cream Sandwich Cookies


(Photo from skiptomylou.org)

This past week we celebrated Isaac's 3rd birthday. (Where has the time flown?! It's hard to believe that he's no longer a toddler and is officially a preschooler!)

Isaac isn't a huge fan of cake, although he loves the frosting, and the ice cream. To make his special day special to him I took a cake mix and made it into cookies. Then we added ice cream between the cookies to make ice cream sandwiches. They were a big hit, although they didn't look quite as perfect as the ones pictured above! :)

Here's the super easy, wonderfully delicious cake mix cookie recipe:
Cake Mix Cookies:
-1 package cake mix (we used Duncan Hines chocolate)
-1/2 cup oil or butter or margarine (softened)
-1 egg

Mix everything together in a bowl until combined. Roll into balls and place on an ungreased cookie sheet. Bake for 8-10 minutes at 350 degrees. Easy, peasy! And yummy too!

You can also add chocolate chips if desired. This is a great cooking project for kids because it's fast and simple. We will definitely be making these again!

Tuesday, December 14, 2010

Looking through a Glass

This science activity came about during lunch with my curious kiddo. While eating, Isaac had his head resting on the table and began looking at everything through my empty glass, making comments like: "It looks like an oval," "It looks bigger," and "It looks taller."

We then filled the glass with water and looked again. Things seemed to change! Isaac was fascinated at seeing for the glass and the water made objects look different. We experimented with different objects and glasses. We'll call it a learning lunch hour! It's all about refraction my dear little one!

Thursday, December 9, 2010

Kitchen Creations: Cake Pops

(Image courtesy of Bakerella)

Last Saturday my church put on a "Super Saturday" which featured lots of classes and projects and a very yummy lunch. One of the classes was about how to make cake pops, or cake balls or cake truffles as I've also heard them called.

These delicious treats are easy, and very kid-chef friendly! You could make them as a gift for family, friends, or teachers, or as a twist on the traditional birthday cake.
(Image courtesy of the kitchn)


Here's what you need:
-one baked cake (you can use a box mix or one from scratch)
-one can frosting
-almond bark coating
-popsicle sticks (optional-without these you can make cake truffles!)

The process:
-bake your cake, let it cool.

-enlist your child(ren) to help you crumble it into crumbs. (They are going to love this part!) Just get your hands dirty and break it all apart in a bowl.

-melt the frosting for 15 seconds in the microwave.

-pour about 3/4 a cup of the warm frosting into the cake crumbs.

-mix together, adding more frosting as needed to get the cake and frosting to a mold-able consistency.

-form the cake/frosting clay into balls, push popsicle sticks into the balls and place in the freezer for 30-45 minutes.

-while the cake is hardening, melt the almond bark according to package instructions.

-dip the cake pops in the almond bark and place on wax paper or tin foil to harden. (you can add sprinkles or nuts at this points too!)

-enjoy!

Tuesday, October 26, 2010

Spooky Quesadillas

In preparation for Halloween we had spooky quesadillas for lunch yesterday. Simple and easy, yummy and spooky all together.


We pulled out the Halloween themed cookie cutters from our big box of 101 cookie cutters (a wonderful present from my late grandma). I made the quesadillas in the microwave for speed and then we pushed out our spooky shapes. What fun!

This would also work well with sandwiches and pancakes.

Tuesday, November 11, 2008

Pancake Fun

The other day I read a fun way to make pancakes with writing or designs in the middle, such as the ones in the picture. Here's how you do it:
-Mix the pancake batter and pour some into a bottle with a spout (such as an old mustard, ketchup, or ice cream topping bottle). You can even use food coloring to dye the batter.
-Then pour/squirt from that container onto the frying pan. (Letters need to be done backwards).
-Let cook for about 30 seconds and then cover the design-carefully-with more batter.
-Cook and flip as normal.
-Enjoy your creative pancakes!
I think preschool age kids would especially enjoy this breakfast treat because they can help make it and practice their letters.

PS: One of our family favorites with pancakes is peanut butter and syrup on top. It may sound weird, but once you try it you'll never go back!

PPS: If you are trying to figure out ways to help your kids eat healthily, check out this web site: http://www.superhealthykids.com/ (make sure you look at her blog!) It has lots of great information and recipes.

Tuesday, October 21, 2008

Homemade Baby Food

The little one is sleeping and so I'll take this chance to write about one of my favorite hobbies as of late, making baby food. (I know that sounds weird, but it really is fun.) Ever since a Best of Enrichment at the beginning of this year when I learned about making my own baby food I have been excited about it. It's easy and saves money. Instead of spending about 55 cents on a container of baby food, (which really begins to add up when baby is eating 2 to 4 jars a day!) that same amount can go a lot farther when making your own baby food.
Here are some of the basics for making baby food at home:

What you need:
-a blender or food processor, or food mill
-fruits and vegetables (and later meats and pasta) Good fruits to start with include apples, apricots, bananas, blueberries, mangoes, peaches, pears, plums, and prunes. Vegetables to try include asparagus tips, avocados, carrots, peas, potatoes, sweet potatoes, and squash. You can use fresh, frozen, and even canned, although fresh or frozen is preferable.

How to do it:
-Bake, boil, or steam the fruit of vegetable until soft.
-Place pieces in the blender and use water from the cooking in the puree.
-Blend to the desired consistence, as you baby gets older you can blend for less time and allow the food to be chunky.
-Pour into an ice cube tray to freeze.
-Once frozen transfer to plastic baggies in the freezer. (bought a few of the Gerber baby foods when we went on a trip and saved the containers, so I now put a few ice cubes in each container in the freezer, which works great.) Fruits and Veggies frozen like this will last 6-8 months.
-When ready to serve dethaw in the fridge, on the counter, or in the microwave. (I usually take what my son will be eating the following day out of the freezer each night and put it in the fridge.)
-When serving you can mix with formula, breast milk, or baby cereal to the desired consistency. Make sure to test the temperature of the food if you dethawed in the microwave!)
-Wait 3-5 days after introducing a new food to make sure baby shows no signs of allergies.
-As baby gets older you can combine foods into purees, such as mixed veggies, rice and bean, chicken and potatoes, etc.

So why do I love it?
-I can feed my baby a variety of foods that he other wise would not get in commercial baby foods, I can make the food to fit his needs regarding consistency, it costs less, I enjoy shopping for deals on produce, and the food looks and smells better than commercial baby food! :)

Some great resources:
"Blender Baby Food" by Nicole Young- a great book that I love! I checked it out from the Provo Library and it is full of 125 recipes for making baby food in the blender.
Daily Baby Food Recipes: just hit refresh each time you want a new recipe!

PS: If you live near a Sunflower Farmer's Market I totally suggest that you go...their produce is amazingly cheap. Like this week they have avocados 3 for a dollar!

Friday, September 19, 2008

Homemade Bib

This web site has really easy instructions (with pictures!) on how to make a bib. There's a printable pattern to trace onto the cloth too!


PS: So I made two of these bibs, and they are really easy and quick. I used snaps for one and velcro for the other, but I think I should sew threw the velcro so that it stays on well.